Flight Instructors Guide
A note to those interested in learning to fly R/C:
An instructor's primary job is to develop safe pilots, hopefully keeping the novice's airplane intact in the process. Because an out of control R/C aircraft can be deadly, a pilot has to be able to force the plane to hold a course, maintain an altitude, be in command, in spite of flying conditions and while following the field's safety rules. Novice pilots able to demonstrate this ability, graduate.To make the learning process go faster, a stable and predictable trainer airplane helps the novice and the instructor a lot! Beautiful scale aircraft or high-performance pattern planes tend to be very bad choices for learning to fly.
Regardless of what plane you choose, everything must be right. Whether it's a kit or Almost Ready to Fly, carefully following the plane's instructions will mean fewer trips back home to fix some tiny but important detail. Attempting to fly a plane with incorrect control throws, a misplaced center of gravity, or dozens of other possible problems usually means the airplane goes home in lots of extra pieces.
Club members will happily give advice on everything needed, and instructors will take the risk of flying your plane for the first time if everything looks good. Unfortunately, they are only human. Problems can go undetected. Disorientation happens. Trees happen. Lapses in judgment happen. Be prepared that things might not go as expected. It wouldn't be so much fun if it were too easy!
Thanks to Mark Hamilton for developing this "Flight Instructors Guide". Though it was written for the club's instructors, beginners can benefit from much of what Mark has written here.
General Tips and Notes:
Even though. the student owns the airplane, The instructor is in charge of the field. There is no exception to this rule.All student's airplanes, whether new or rebuilt, should be inspected by a certified club instructor. Instructor's inspection does not guarantee the plane will not crash but it's a good idea to cover all the bases just in case.
Instructors are not responsible for any mishaps or damage done to a student's airplane due to a crash during training. However it is imperative that you conduct yourselves in a professional manner. Do not use the student's airplane to "show your stuff". Don' t stray from the general idea here.
It's important to teach students to use the fre-quency control system properly.
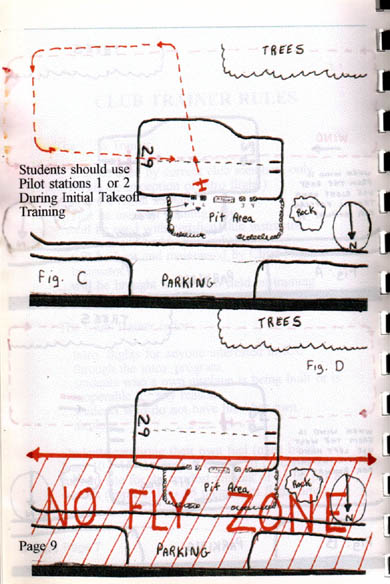
It's important that students know where the no fly zones are:
- No flying anywhere on the north side of the flight line.
- No flying on the west side of the paved access road.
Some will even take longer than that. Please remember it was for you when you first started. If you find you are having a personality conflict with a student, ask to have another instructor take over. This is to be fun for you too! Have Patience! Mostly Have FUN!!
Training can be repetitive and boring at times but it is imperative that the student master the basic maneuvers in the flight training program to pass the flight test and become a safe and proficient pilot. Remember there is no time limit for the student to learn or take the test.
Inspection of A New Airplane:
- Wings off
- Make sure servos are mounted correctly.
- Check push rods for good connections and that there is no binding
- Check receiver switch and battery pack to be sure they are secure and protected from vibration.
- Check that antenna is not folded or bunched up.
- Check control horns and connections on elevator and rudder.
- Check throttle linkage
- Check aileron servo control rods and connections mount wings using no less than 10 rubber bands.
- Frequency pin on board.
- Switch on radio and airplane.
- Check control surfaces for correct movement.
- Make sure nose wheel and rudder move in harmony
- Make sure engine, prop and spinner are tight.
- Ask student if prop has been balanced.
- Ask student if plane has been balanced on C.G.
- Ask student if batteries are fully charged.
- Do a radio range check.
- Start engine and adjust needle.
- Take airplane up without buddy box the first time and get it trimmed out.
- Set up buddy box.
- Instructor takes off and adjusts both radios.
Teaching the Student:
Teach each student how to make turns without losing or altitude.Don't teach students how to take off or land until they have mastered the skill to turn and maneuver the airplane. (There is no sense in teaching the student how to take off if he/she can't fly the plane after it leaves the ground.)
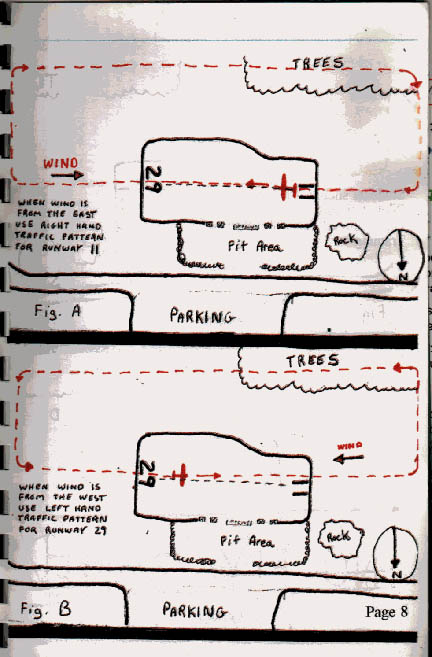 Teach the student how to fly the traffic pattern making turns maintaining
constant altitude. The pattern should be rectangular.
Teach the student how to fly the traffic pattern making turns maintaining
constant altitude. The pattern should be rectangular.Upwind leg should be flown over center line of runway followed by a 90° turn to cross wind leg followed by a to down wind leg. Parallel with runway center. Then another 90° turn to base leg followed by a 90° turn back to upwind leg (see figure A + B).
Next, teach the student how to do a figure eight. The eight should be round circles keeping the airplane at constant altitude.
Teach student how to coordinate rudder and ailerons together to make coordinated turns. (One-stick pilots can be dangerous).
After the student has mastered these maneuvers its time a to learn how to take off and land.
The first few take off should be done in a straight out fashion (see figure C.). The student will have better control when he/she is standing behind the aircraft. Teach the student how to counteract torque by using lie right rudder on climb out.
 When the student can take off straight out with good control he or she
can then learn to take off using regular runway heading. See figure A + B.
When the student can take off straight out with good control he or she
can then learn to take off using regular runway heading. See figure A + B.
Teach each strident to take off and stay within the normal traffic pattern and setup a. normal glide for landing. The landing approach should be smooth, not like an out of control roller coaster!
Now the student must Practice, Practice, Practice!
Once the student can take off, fly the pattern and land confidently and safely and when the instructor feels that the student is ready, The student may take the flight test.
Advanced maneuvers: Dead stick landings and stall recovery.
F1ight Instructor will give flight test.
The Flight Test:
- Pre-flight check
- Start engine and run up.
- Taxi to take off position.
- Take off
- Fly traffic pattern.
- Set up for landing.
- Land
Simulate a dead stick. (May happen at any time during test)
Figure eight pattern. (Student must show complete control turning in both directions all the while maintaining constant altitude)
Show stall recovery skills.
Pass the test - earn your wings!